Editor’s note: Don’t miss Part 1 and Part 2 of this series.
So you want to take your pouring to the next level? Once again we lean on Carl Wengenroth of Del Rio, Texas, for his expertise in all things soft plastic. Wengenroth feels that there are a few things one needs mastery of to be considered an advanced pourer, mainly swirls, laminates, and creating your own molds.
Custom molds are how Wengenroth made a name for himself and his company, RiverSlung Bait Co. Read about his larger-than-life plastics here.
Growing Molds
Many pourers will be satisfied with molds that are available, mainly because molds for the most popular worm styles are plentiful. However, if you’re not satisfied with off-the-shelf molds, or if you want a one-of-a-kind worm, you may want to make your own molds. Like ammunition, cigarettes and worms, they’re cheaper when you roll ’em yourself.
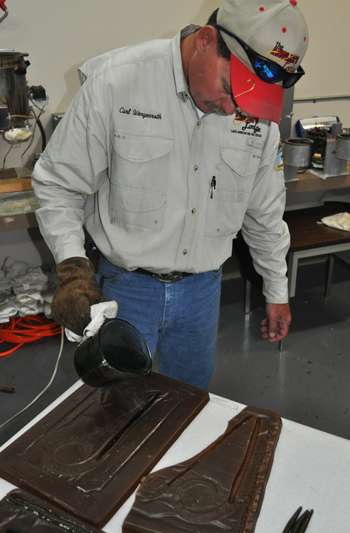
There are three kinds of molds: RTV silicone, fiberglass and aluminum. In general, RTV are the most prevalent but a pain to make, and aluminum can be prohibitively expensive. Fiberglass is the simplest, most cost effective and what Wengenroth prefers for most of his plastics, so we’ll detail it here.
“Fiberglass’ only drawback is that it shatters if you drop it,” he says. “Other than that, it’s very simple to make, and one you’ve made it, you can tweak it with a Dremel tool.”
You’ll need some fiberglass resin, a baking pan with a flat bottom, the worms you wish to replicate, a roll of laminating paper and some tape.
Cover the bottom of the pan with laminating paper, sticky side up. Secure the paper to the pan with tape on each wall of the pan. You then place the baits you wish to replicate on the sticky paper. Wengenroth will put up to 10 baits in an 8 1/2- by 11-inch pan. Fill your Pyrex with resin, add the activator and pour it over the baits, completely covering them in about one inch of plastic.
In an hour, you new mold will be ready, but Wengenroth lets it sit for 4-5 hours to be sure everything is settled. After cooling off, simply turn the pan over and the mold falls out.
However, suppose you want your stickbait to have tentacles or you want your craw to have bigger pincers. As Wengenroth said, get out the Dremel tool and make it happen.
Swirls and Laminates
Making swirl color patterns is easier than you may think. The swirl effect comes from a modification to your Pyrex cup.
“All you do is create a divider of aluminum roof flashing that runs from the top to the bottom of your Pyrex ,” Wengenroth says. “Flashing is the only thing that will handle that much heat and not melt. If I’m doing a laminate, I have the flashing come up to the lip of the Pyrex so it runs straight across from the spout to the opposite side. If I’m doing a swirl, I cut the corner of the flashing before it reaches the spout so the plastic will mix while it’s still in the cup.
“In other words, for swirls you want both colors of plastic to mix in the top quarter of the Pyrex, hence why you took a corner off the flashing. For laminates you don’t want it to mix before it hits the end of the spout, so you leave the flashing rectangular,” he says.
However, simply making a divider in your Pyrex won’t laminate or swirl worms alone. There’s a fairly simple technique for each.
“With laminates, you keep your hand perfectly still as you pour. It doesn’t matter which angle you pour it into the mold because naturally it’s going to be half and half,” Wengenroth explains. “With a swirl, even though it is mixing as you’re pouring it, you want to move your hand in a slow circular motion as you run the length of the mold. It really gives it a nice effect. You can also run back and forth. Either way, it’s a lot of fun making one-off colors that no one else has.”
See Part 1 and Part 2 of this series.
Originally published June 2010


