Editor’s note: Don’t miss Part 1 and Part 3 of this series.
In the first part of this two-part series, we detailed everything a novice worm pourer will need to begin making his own soft plastics. We found that it’s possible to get into custom soft plastics for less than $100.
In this second part, worm guru Carl Wengenroth shows you the process by which he’s successfully poured worms for nearly a decade.
Preparation
Before you begin, Wengenroth recommends having your workspace ready to go. You’ll need your microwave, Pyrex, table, plastic and molds.
Now is when the customization begins. It’s best to keep colors, salt and glitter simple for your first batch of worms. You probably won’t make a batch of 10-inch, heavy-salt motor oil/watermelon red with gold flake ribbontail worms your first time out.
Once you have your supplies, it’s time to start the magic.
The process
Wengenroth has his own system for making his plastics. His process is similar to others, but he adds a few of his own twists. Over time, you will, too. Directions elsewhere may differ, but the process is basically the same. Before you begin, it’s important to shake and stir the plastic thoroughly as some brands settle to the bottom of the container.
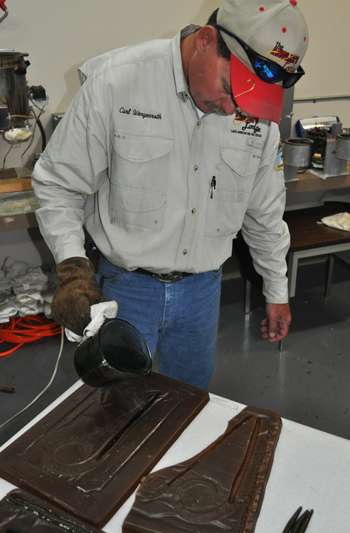
“First, put your shaken plastic in the Pyrex. Put your color in and mix it with a butter knife. Follow the manufacturer’s instructions for the proper amount of color to be added to the plastic. Place it in the microwave for three minutes and pull it out with a gloved hand. Make sure it’s nice and thin. If it’s not, put it in for another 30 seconds. After that, you’re ready to add glitter. Typically, 1/8 teaspoon is good per cup. If you really want to load it up, go for 1/4 teaspoon. Too much will keep the plastic from setting up right. Once that’s in, mix it and pour it slowly into the mold,” he says.
“After you let it set and cool for about four or five minutes, they should be ready to be taken out and put on a clean cloth,” he says. “Let them set up for about 12 hours, then they’re ready for bagging and fishing.”
Seem easy enough? It is. However, Wengenroth has a few pieces of advice — and a little theory — not found in any manual.
“There are three kinds of plastic. The softest is known as the West Coast formula. It’s also the least durable. One hit and it’s usually done,” he says. “The next is standard plastic. This is what most manufacturers use and what you’re probably familiar with. Last is saltwater grade. It’s the most durable but least soft. I use a 50/50 combination of standard and saltwater to get softer baits that last a long time.”
Wengenroth says this mixture is necessary for him given the large and unique baits he pours. In his directions, you may have noticed he didn’t mention when or how to add salt.
“I don’t use salt in my baits for three reasons. First, it can weaken the bait. Plastics that are loaded with salt don’t last nearly as long as those without. Also, without salt your baits will float, which can be a good thing,” he says. “Lastly, you can’t reheat plastic with salt in it. If you try to it’ll turn into a big wad of goo.”
Making saltless plastic means you can reheat and recycle what’s left in your Pyrex after filling your mold(s).
“You’re going to want to get a good color wheel, too,” he advises. “It’s a great tool for beginners to use so you know if your recipe is correct. It’ll also help you make colors using other colors.”
Speaking of recipes, Wengenroth says you will get more success and enjoyment out of your homemade plastics if you record every formula you make. Even unsuccessful formulas need to be recorded so you don’t make the same mistake twice. Everything from the number of drops of color to the amount of glitter to the time you heat a certain brand is worth noting.
Lastly, Wengenroth says you shouldn’t feel boxed in by what major manufacturers make. He believes in putting the “custom” back in custom soft plastics.
“Making your own plastics is smart and exciting,” he says. “You’re like a kid with a box of crayons. You can make anything you want in any color you want.”
See Part 1 and Part 3 of this series.
Originally published June 2010


